


DrOwl is a medical platform built on patented technology, that provides a safe place to sync, organize, search, and share your digital medical records on-demand.
Once a user securely syncs their medical records, DrOwl uses AI and machine learning to provide users with a Patient Portal based on the Patient’s health records that include trusted, doctor-approved sources of information that is customized for each user and makes their medical information easier to understand. DrOwl users can also share their customized Patient Portal with caregivers or family members to include them in the patient’s healthcare decisions. Users can also initiate telehealth sessions 24×7 and allow their caregivers or family members to join in the secure telemedicine video call.*
DrOwl also has a free electronic screening and monitoring solution to help protect schools, senior communities, and businesses during infectious disease outbreaks. Where staff, residents, and visitors can electronically “check-in”, answering a list of questions that helps screen for symptoms and history of exposure. This creates an electronic log of employee and visitor activity, in real-time. And reports can be run as needed to assist in contact tracing if an infection is reported. In cases of infection, there is electronic tracking with centralized data for epidemiological usage and cross-contamination data to help assess the risks.
*Telemedicine available in select areas with more being added all the time.
Go to the iOS or Google Play stores to download the DrOwl app today to sign-up for an account.

![]()
Download the DrOwl app and then open it up and tap the sign-up button on the lower left-hand side of the screen.
Fill in your name, click the box to agree to the DrOwl terms, and tap on the green next button on the lower left-hand side of the screen. Then fill in your email, choose a password, enter your cell phone, and click the green next button on the lower left-hand side of the screen.
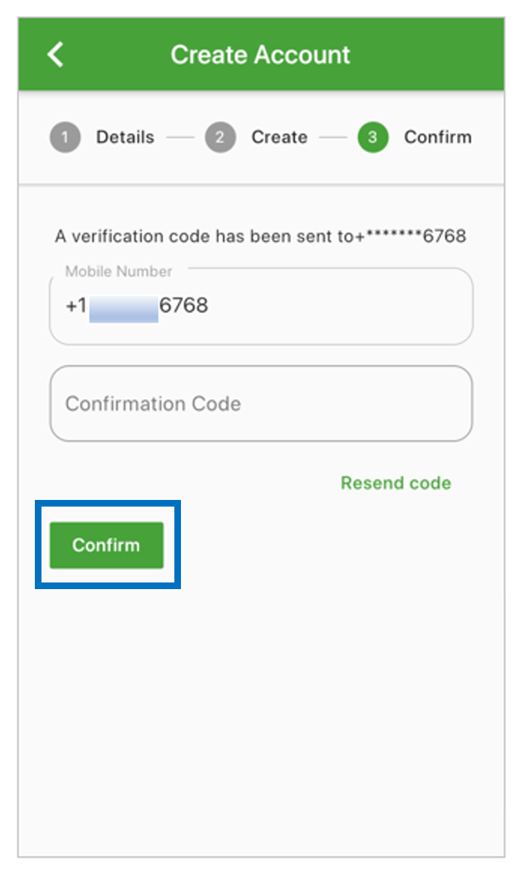
You will then get a verification code sent to your cell phone via a text message to verify your account.

Once you get the verification code, enter it into the confirmation code box, and click the green confirm button in the bottom left-hand of the screen to complete the sign-up process.
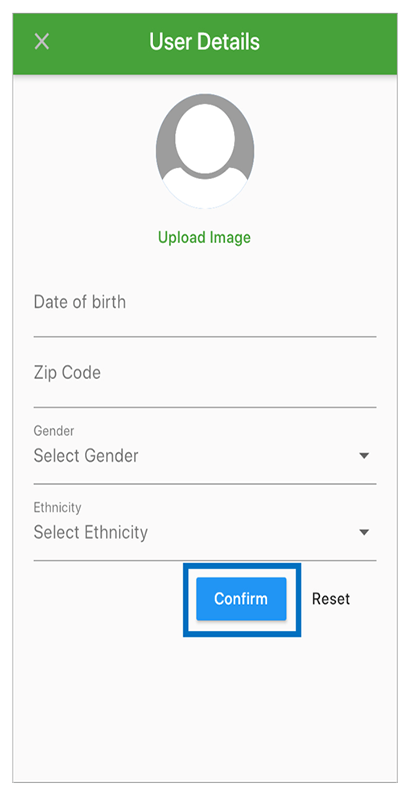
The final step in signing up for DrOwl is to add the user details for yourself into your account. This information is not disclosed to anyone other than you.
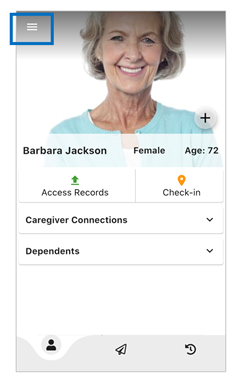
The DrOwl menu is on the top left-hand corner of the homepage of the app, and you can open it by touching the three white bars on the top right-hand side to open up the menu.
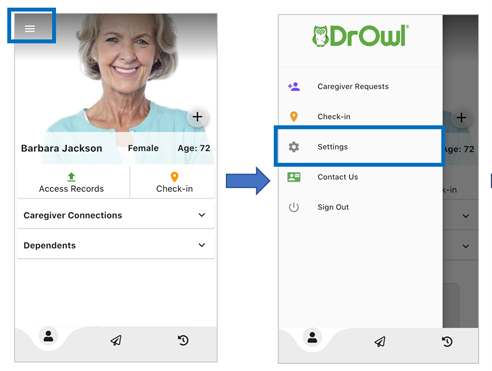
To update your password, touch the three white bars on the top left-hand side to open up the menu, and choose settings from the menu.
Then click on change password, add in your old password, and choose a new password that you’d like to use for going forward. Click on the green reset button at the bottom of the page to finish resetting your password when you are done.

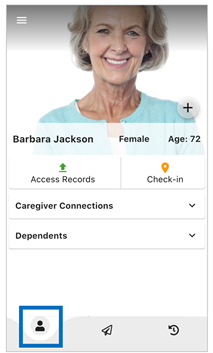
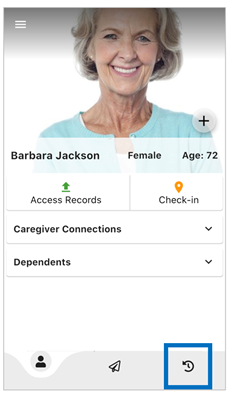
To go to your timeline, click on the timeline icon on the right-hand side of the bottom menu. This will take you back to your timeline where you’ll be able to see notifications for things like:
If you’d like to give feedback, click on the contact us button in the upper right-hand corner of the top menu.

When the contact page comes up, fill out the form to contact us, and click on the grey submit button in the lower left-hand corner at the bottom of the page to send it to us.

Please know that we really appreciate your feedback in helping us to make it the best possible community experience on DrOwl for everyone!
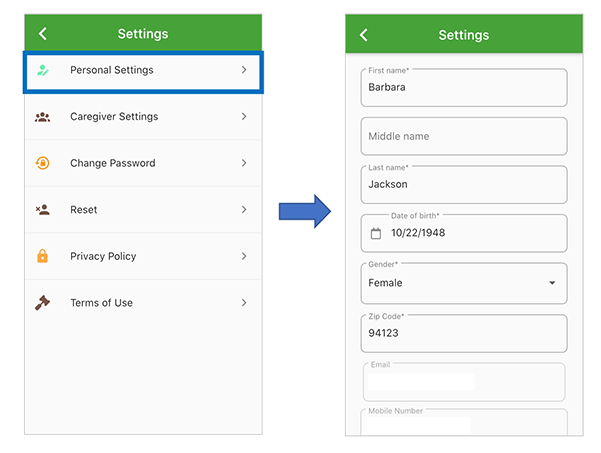
To update your account profile, go to the homepage of the app, and touch the three white bars button on the upper left-hand side of your screen to open up the menu. Then click on settings in the menu.

Once you’ve gotten into the settings menu page, choose personal settings, and make the changes that you’d like to make. When you are done making your changes, click on the blue confirm button to finish updating your user profile.
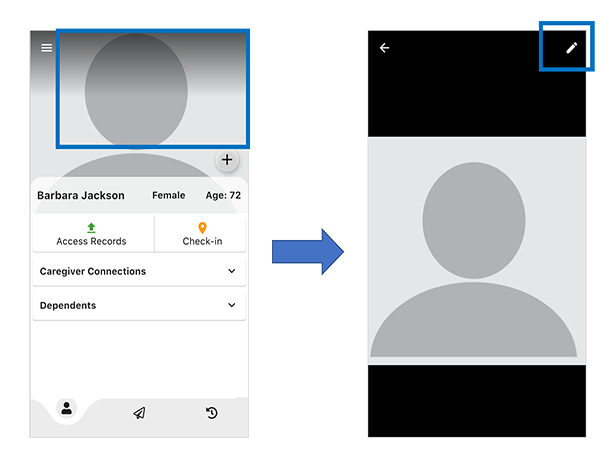
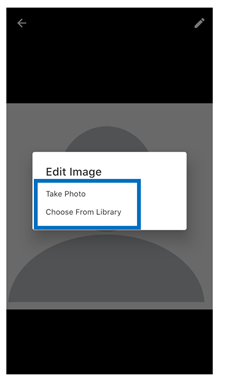
To add your profile photo, touch the generic user profile image at the top of your homepage to bring up the edit page. When that page comes up, touch the white pencil icon on the upper right-hand side of the page to add a new profile image.
You will then be able to choose to either take a photo or add an image from your phone’s library. Once you find the image that you would like to use, click on it to finish adding it as your new profile photo.
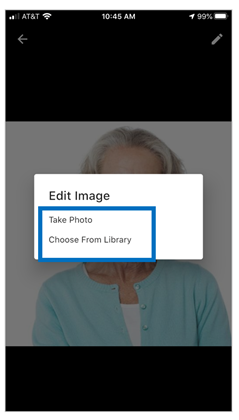
To change your profile photo, touch the profile image at the top of the homepage to bring up the edit page. When that page comes up, click the white pencil icon on the upper right-hand side to change your profile image.

You will then be able to choose to either take a photo or add an image from your phone’s library. Once you find the image that you would like to use, click on it to finish editing your profile photo.
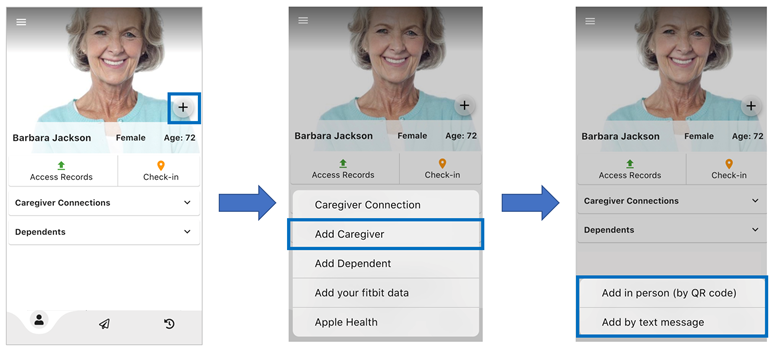
To add a caregiver, click on the plus sign on the bottom right-hand side of your profile image on the homepage of the app, and choose the add caregiver option.
Then select whether you want to add the caregiver by a QR code or by a text message by clicking on your preference.
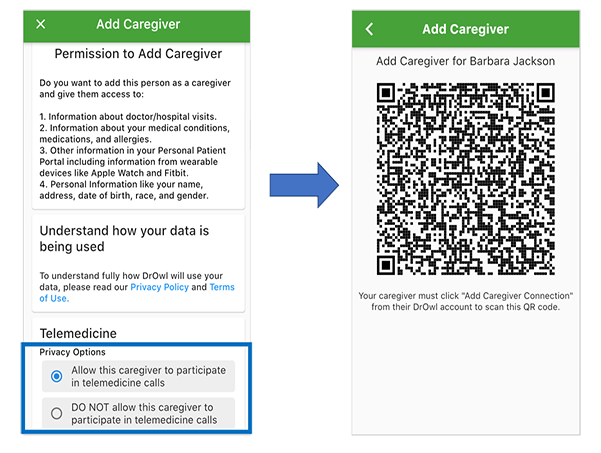
If you are adding your caregiver by QR code, click on that option, select whether you would like to add them to your telemarketing calls or not, and then you’ll see the QR code.
Please note that your caregiver must click on the add caregiver connection in their DrOwl account to scan this QR code and to be added as a caregiver on your DrOwl account.
If you are adding your caregiver by text message, click on that option, select whether you would like to add them to your telemarketing calls or not, and then click on the person from your phone contacts that you would like to add as a caregiver by text.
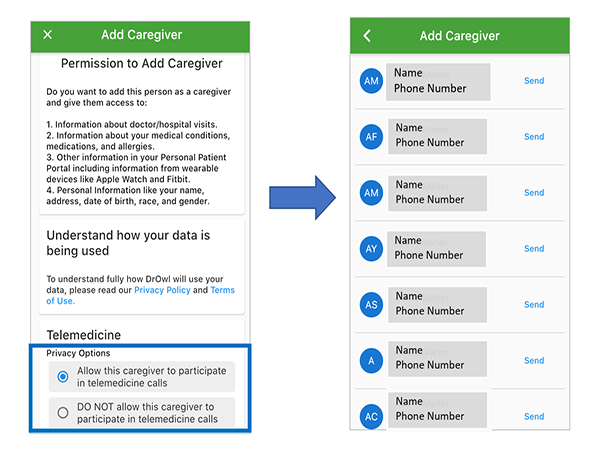
Please repeat this process for every caregiver that you would like to add.
Remember that not only can you securely share your medical history with your caregivers, but you can also add them to telemedicine calls so that they can be a part of important medical discussions regardless of location or time zone.*
*Telemedicine available in select areas with more being added all the time.
If you would like to remove a caregiver, go to your homepage in the app and click on caregiver connections to bring up your caregivers.
Then click on the pencil edit icon and choose the remove button for any caregiver that you would like to remove from your DrOwl profile.

To update your password, go to the homepage of the app, and touch the three white bars button on the upper left-hand side of your screen to open up the menu, and choose settings from the menu.

Then click on caregiver settings to change any telemedicine permissions for your caregivers, by simply sliding the button to change the permissions.
Slide the button to the right to give permission for your caregiver to join your telemedicine calls.
Please note that when you’ve given permission the button will be blue and when you haven’t given permission the button will be grey. It’s an easy way to see if you’ve give them permission to join your telemarketing calls.

It’s important to note that you need to have a caregiver connection with someone to chat with them on DrOwl. A “caregiver connection” means that either you are their caregiver, or they are your caregiver…That is what makes a “caregiver connection”.
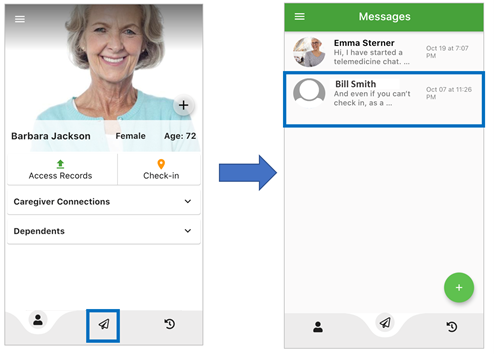
If you would like to message someone that you have an existing conversation with, click on the direct message icon in the middle of the lower menu on the DrOwl app homepage that looks like a paper plane and you’ll see all of your existing DrOwl conversations.
To send a new message, touch the name of the person that you would like to chat with to bring up the chat window.
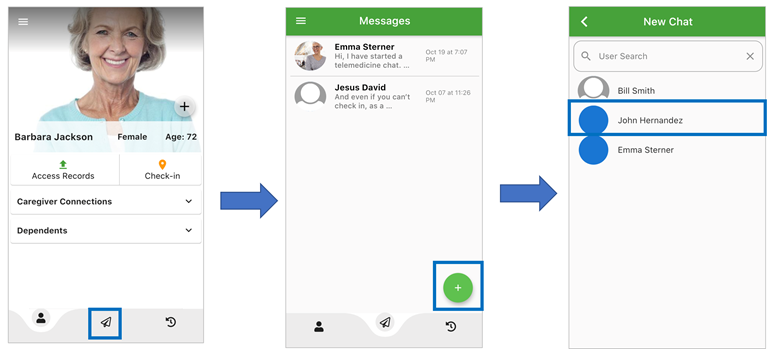
If you would like to start a new chat with someone, that you don’t have a current chat with, click on the direct message icon in the middle of the lower menu on the DrOwl app homepage that looks like a paper plane to bring up your messaging window.
Then click on the green plus sign in the lower right-hand corner and choose who you would like to chat with. If you don’t see their name, type it in the search bar to find them, and then click on their name to start a new chat with them.
No, you don’t. As a parent/guardian, you will only create one account for yourself and then add in all of your children as “dependents”. You will then be able to use one login for the whole family.
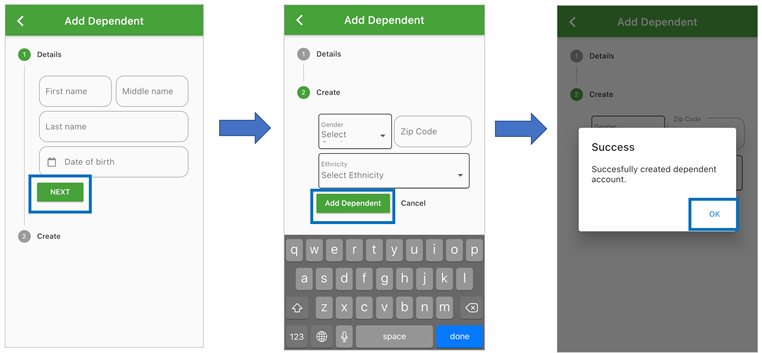
Adding dependents to your DrOwl account is easy. Go to your DrOwl homepage on the app, and then click the plus sign at the bottom right-hand corner of your profile image and choose the add dependent option.

Then fill in your dependent’s first and last name and date of birth and click the green next button in the lower left-hand corner at the bottom of the screen. The next step is to select their gender, zip code, and ethnicity, and click on the green add dependent button at the bottom of the page to finish adding a dependent.
When you are done adding your dependent you will see a success message to confirm that you’ve successfully created a dependent account.
Please repeat this process for every dependent that you would like to add.
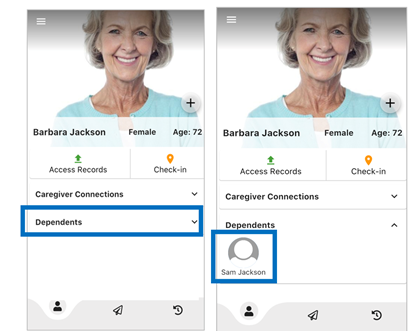
To update your dependents settings, go to the DrOwl app homepage and click on dependents. Then choose the dependent whose settings you’d like to update and click on their name to open up their user profile.
When their user profile is up on the page, touch the white three-dot menu in the upper right-hand side of the page and then click on personal settings when the menu pops up.
Make any changes that you would like to their profile. and click on the blue confirm button at the bottom of the page to finish making changes to your dependents profile when you are done.

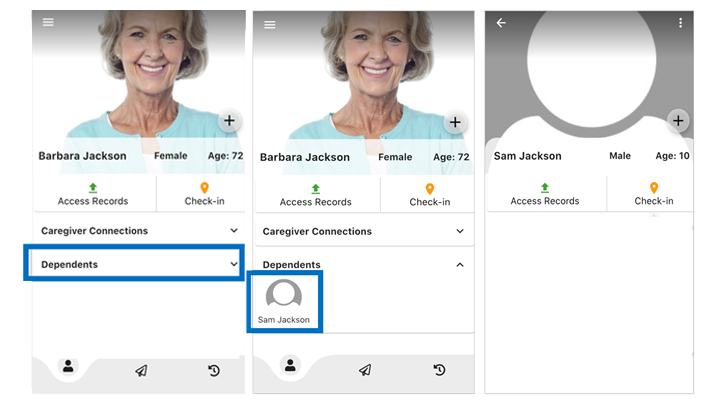
To see your dependents profile, go to your homepage on the app, click on dependents, choose the dependent whose profile you’d like to look at, and then click on their name to open up their user profile.
Please note that you will only be able to message dependents or caregivers that you are connected to in DrOwl.
If you would like to message your dependent that you have an existing conversation with, click on the direct message icon in the middle of the lower menu that looks like a paper plane on the app homepage and you’ll see all of your existing DrOwl conversations.
To send a new message, touch the name of the person that you would like to chat with to bring up the chat window and start your chat.

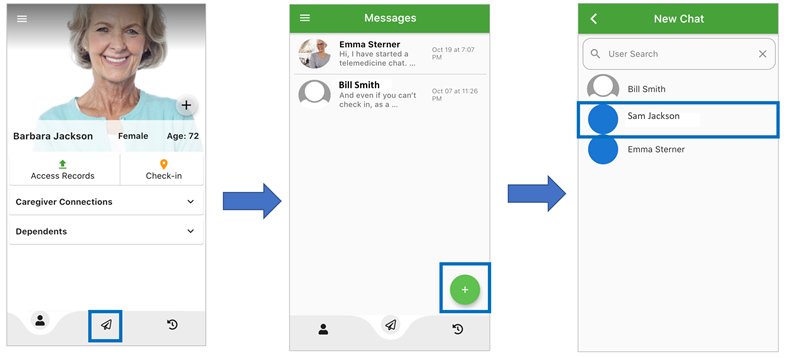
If you don’t have a conversation already started with your dependent, but you would like to chat with them, click on the direct message icon in the middle of the lower menu on the app homepage that looks like a paper plane to bring up your messaging window.
Then click on the green plus sign in the lower right-hand corner and choose who you would like to start a new chat with. If you don’t see their name, type it in the search bar. When you see their name, click on their name to open up the chat window and to start communicating with them.
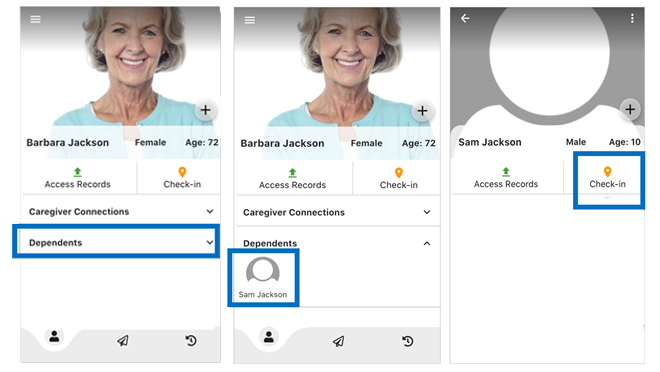
To check-in your dependent for a facility, go to the DrOwl app homepage, and click on dependents.
Then choose the dependent that you would like to check-in, and click on their name to bring up their profile. When their DrOwl profile is up, click on the check-in box to start the check-in process for them.
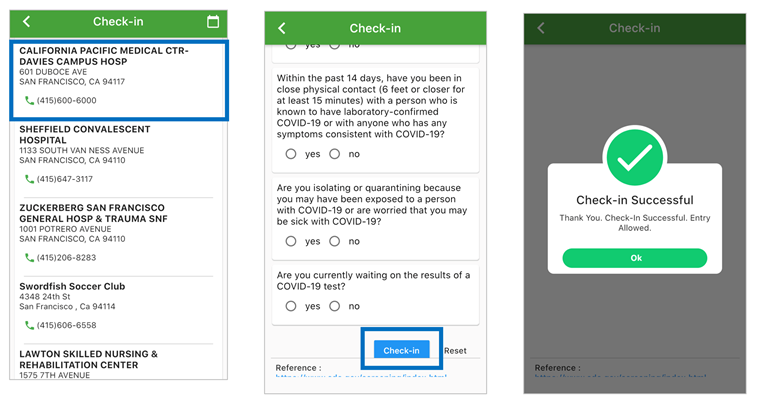
The next step is to select the location where you would like to check them in. When you find the location that you are looking for, click on it to bring up their screening questions, and answer the questions.
When you are done answering the questions, click on the blue check-in button at the bottom of the page to finish checking in your dependent.
If you have more than one dependent that you are checking in, you’ll need to repeat the above steps until you’ve checked in all of the dependents that you need to.
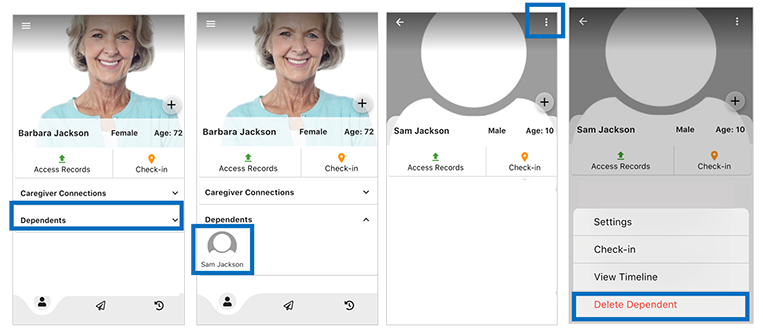
To remove a dependent from your DrOwl account, go to the DrOwl app homepage and click on dependents.
Then choose the dependent that you would like to remove, and click on their name to bring up their profile. When their DrOwl profile is up, click on the white three-dot menu in the upper right-hand corner of their profile image to bring up the dependents menu and select delete dependent to remove them from your DrOwl account.
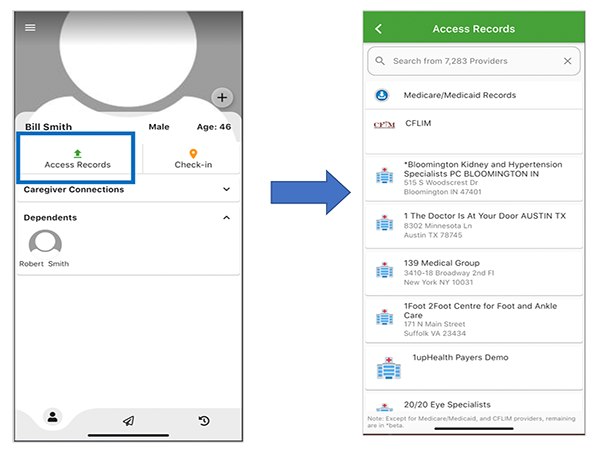
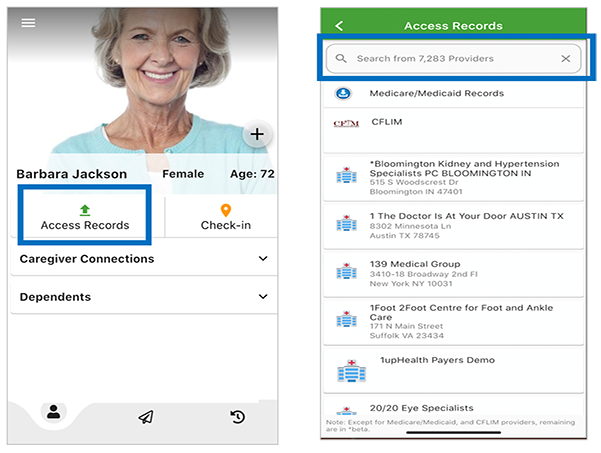
To sync your medical history, go to your DrOwl homepage on the app, and click on the access records button. Then choose if you’d like to sync your medical files from Medicare/Medicaid or one of over 7,200+ medical providers, by clicking on where you’d like to sync your medical records from.
To sync your medical records from Medicare/Medicaid:
Tap access records to bring up the choices of where you can sync your medical records from including Medicare/Medicaid.
Go to the Medicare/Medicaid records choice under the search bar at the top of the access records page and click on it to choose to sync those medical records to DrOwl.
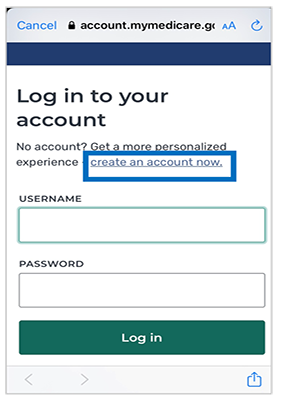
You will then be asked to sign in to cms.gov (account.mymedicare.gov) to log into your Medicare/Medicaid account. Put in your username and password and then click on the green login button.

You will then be asked to sign in to cms.gov (account.mymedicare.gov) to log into your Medicare/Medicaid account. Put in your username and password and then click on the green login button.
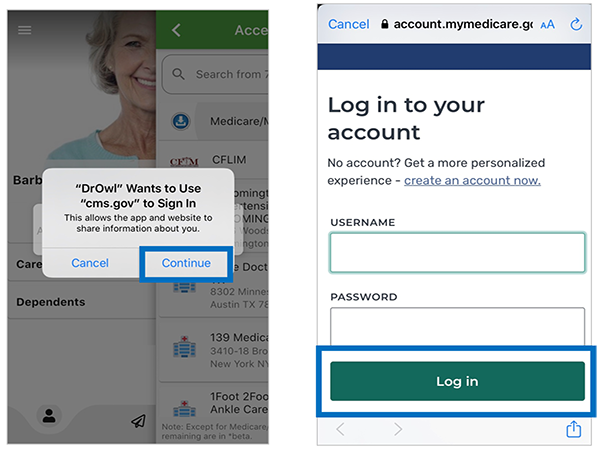
If you don’t have an online CMS.gov (Medicare/Medicaid) account, click on the blue create an account now to create one. And then once you’ve created an account, follow the same steps as above to login into your CMS.go (Medicare/Medicaid) account.
Choose the DrOwl privacy option that you would like, and click on the green allow button at the bottom to finish signing in to Medicare/Medicaid and syncing your medical history to DrOwl.

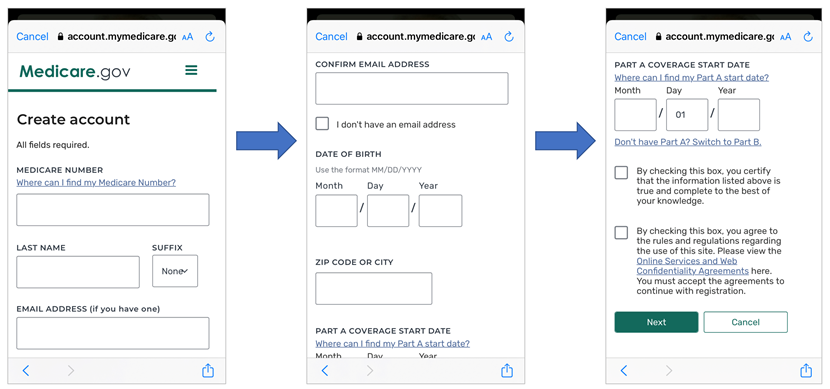
If you don’t have an electronic CMS (Medicare/Medicaid) account, click on the blue “create an account now” link at the top of the “CMS.gov” log in page to create one.
You will then be asked to fill out the Medicare/Medicaid online form to create an account.
Please note that you will need to keep your red, white, and blue Medicare card handy when you fill out the form because you will need the Medicare number, and coverage start dates for the form.

To fill out the electronic “create account” form, add in your Medicare number, name, email, date of birth, zip code or city, and Part A coverage start date to create your CMS (Medicare/Medicaid) online account.
Once you’ve created your account, follow the steps outlined above at the start of this question/answer to sync your Medicare/Medicaid records to DrOwl.
To sync your medical records from one of over 7,200+ medical providers throughout the U.S.:
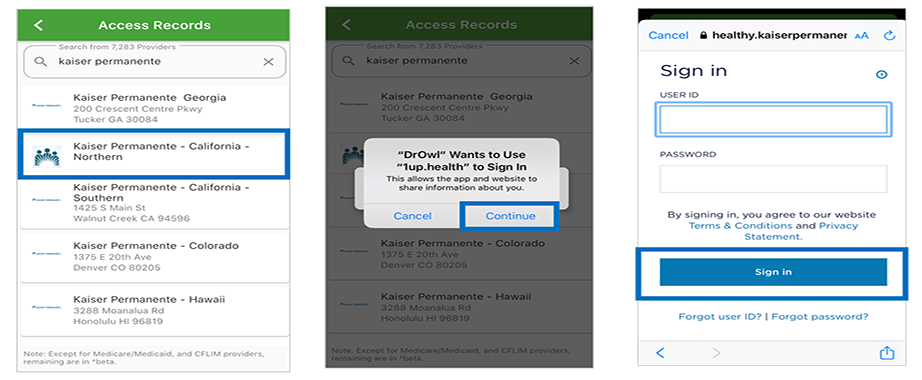
Tap access records to bring up the choices of where you can sync your medical records from, and type the medical providers’ name that you would like to sync your medical records from in the search bar up at the top of the access records page.
Once you’ve found your medical provider, click on their profile, and follow the steps to sign in to your account to sync your medical files.
Please note that DrOwl uses a platform called “1up.health” to securely sign in to your account with your medical provider. Once you’ve signed in you will be asked for permission to sync your account to DrOwl. Follow through the steps to complete the process to securely sync your medical records to your DrOwl account.
Once you’ve synced your medical history, go to your DrOwl homepage to access it again. Click on your conditions, medications, or allergies to see the detailed medical history all in one secure place.
The DrOwl Patient Portal also includes trusted, doctor-approved sources of information that are customized for each user and makes their medical information easier to understand.
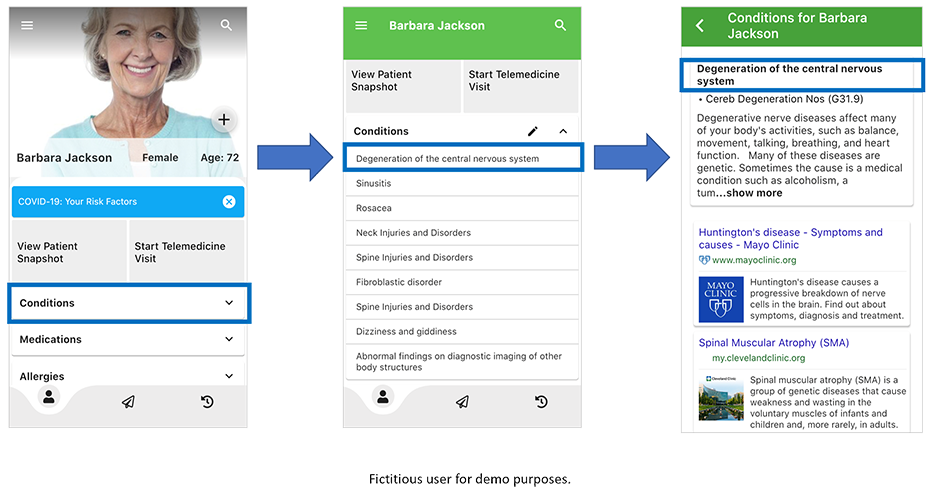
Once a user securely syncs their medical records, DrOwl uses AI and machine learning to provide users with a Patient Portal based on the Patient’s health records that include trusted, doctor-approved sources of information that is customized for each user and makes their medical information easier to understand.
Users can also share their customized Patient Portal with caregivers or family members to include them in the patient’s healthcare decisions.
Patients can initiate telehealth sessions 24×7 directly from the DrOwl app, and add their caregivers or family members to the secure telemedicine video calls as needed.*
*Telemedicine is available in select areas with more being added all the time.
You can securely share your DrOwl Patient Portal with family, caregivers, and doctors as needed.
To share it, add the person as a caregiver and then they will be able to see your conditions, medications, and allergies.
Here are the steps to add a caregiver to your DrOwl account:
To add a caregiver, click on the plus sign on the bottom right-hand side of your profile image on the homepage of the app, and choose to add a caregiver. Then select whether you want to add them by QR code or by text message by clicking on the choice that you’d like.

If you are adding your caregiver by QR code, click on that option, select whether you would like to add them to your telemarketing calls or not, and then you’ll see the QR code.
Please note that your caregiver must click on the add caregiver connection in their DrOwl account to scan this QR code and to be added as a caregiver on your DrOwl account.
If you are adding your caregiver by text message, click on that option, select whether you would like to add them to your telemarketing calls or not, and then click on the person from your phone contacts that you would like to add as a caregiver by text.
Please repeat this process for every caregiver that you would like to add.
Remember that not only can you securely share your medical history with your caregivers, but you can also add them to telemedicine calls so that they can be a part of important medical discussions regardless of location or time zone.*
*Telemedicine available in select areas with more being added all the time.
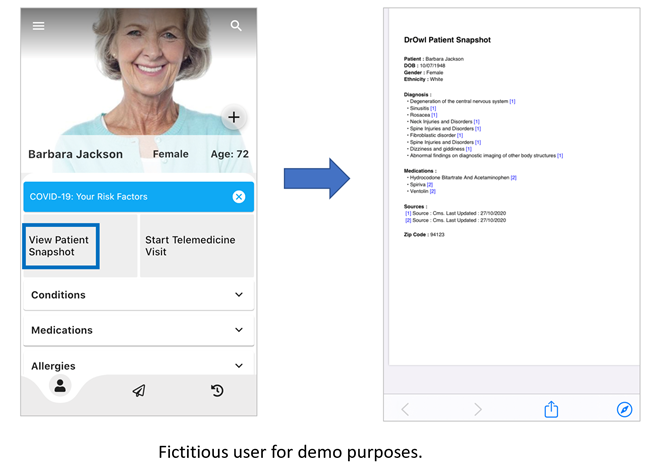
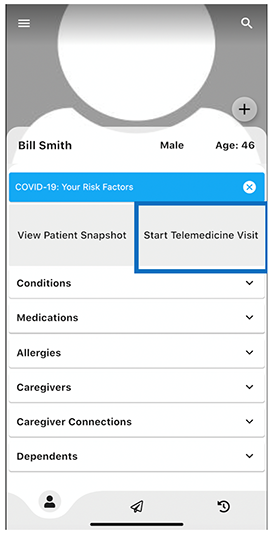
The Patient Snapshot is a summary of the users conditions, medications, and allergies and it can be found on the homepage of your DrOwl app.
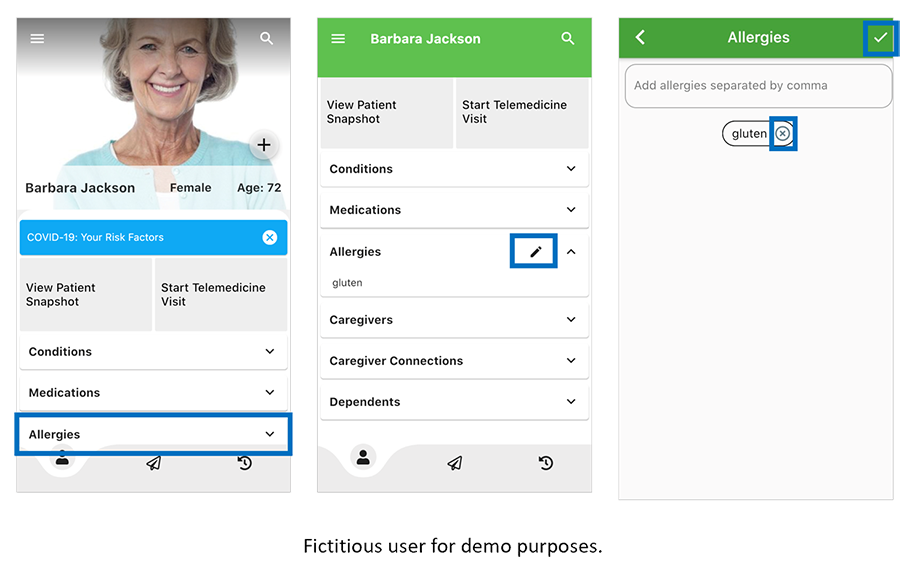
To add something to your conditions, medications, or allergies, start by going to the homepage of your DrOwl app.
And then choose which section you would like to add something to and click it to open up the page for it. Type in what you would like to add to that section and click on the white checkmark in the upper right-hand corner of the page to finish adding it.

To delete something from your conditions, medications, or allergies, start by going to the homepage of your DrOwl app.
And then choose which section you would like to delete something from and click it to open that section up. Click on the pencil icon on the right-hand side of that section and then when the page comes up, touch the “x” to the right of the selection that you would like to delete. Once you are done, click on the white checkmark on the upper-right hand side of the page to finish deleting it.
To start a telemedicine visit with one of DrOwl’s telehealth doctors, you will need to start by syncing your medical records so that your telehealth doctor can see your medical history.
To sync your medical history, go to your DrOwl homepage on the app, and click on access records. Then choose if you’d like to sync your medical files from Medicare/Medicaid or one of over 7,200+ medical providers throughout the U.S. by clicking on where you’d like to sync your medical records.
To sync your medical records from Medicare/Medicaid:
Tap access records to bring up the choices of where you can sync your medical records from including Medicare/Medicaid.
Go to the Medicare/Medicaid records choice under the search bar at the top of the access records page and click on it to choose to sync those medical records to DrOwl.
You will then be asked to sign in to cms.gov (account.mymedicare.gov) to log into your Medicare/Medicaid account. Put in your username and password and then click on the green login button.
You will then be asked to sign in to cms.gov (account.mymedicare.gov) to log into your Medicare/Medicaid account.
If you don’t have an online CMS.gov (Medicare/Medicaid) account, click on the blue create an account now to create one.
Once you’ve put in your user name and password, click on the green login button at the bottom of the page, choose the DrOwl privacy option that you would like, and click on the green allow button at the bottom to finish signing in to Medicare/Medicaid and syncing your medical history to DrOwl.
If you don’t have an electronic CMS (Medicare/Medicaid) account, click on the blue “create an account now” link at the top of the “CMS.gov” log in page to create one.
You will then be asked to fill out the Medicare/Medicaid online form to create an account.
Please note that you will need to keep your red, white, and blue Medicare card handy when you fill out the form because you will need the Medicare number, and coverage start dates for the form.
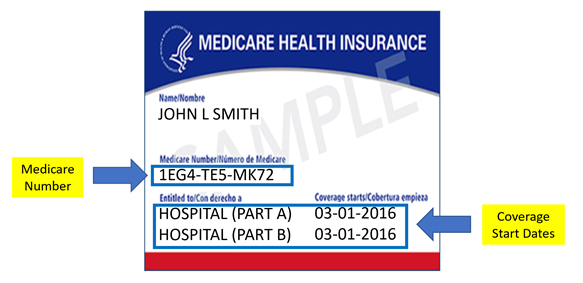
To fill out the electronic “create account” form, add in your Medicare number, name, email, date of birth, zip code or city, and Part A coverage start date to create your CMS (Medicare/Medicaid) online account.

Once you’ve created your account, follow the steps outlined above at the start of this question/answer to sync your Medicare/Medicaid records to DrOwl.
To sync your medical records from one of over 7,200+ medical providers throughout the U.S.:
Click on access records to bring up the choices of where you can sync your medical records from, and then type the medical providers’ name that you would like to sync your medical records from in the search bar up at the top of the access records page.
Once you’ve found your medical provider, click on their profile, and follow the steps to sign in to your account to sync your medical files.
Please note that DrOwl uses a platform called “1up.health” to securely sign in to your account at your medical providers. Once you’ve signed in you will be asked for permission to sync your account. Follow through the steps to complete the process and securely sync your medical records to your DrOwl account.
Once you’ve signed into your medical provider, return to your DrOwl profile and click on “Start Telemedicine Visit” to start your telemedicine call.
You’ll then be asked about your visit and given an update of when your call will begin.
Please note that you can also add family members or caregivers to the call so they can be a part of important medical conversations regardless of location or time zone.*
*Telemedicine is available in select areas with more being added all the time.
To add a family member or caregiver to a telemedicine call you need to start by adding them as a “caregiver”.
If you are adding your caregiver by QR code, click on that option, select whether you would like to add them to your telemarketing calls or not, and then you’ll see the QR code.
Please note that your caregiver must click on the add caregiver connection in their DrOwl account to scan this QR code and to be added as a caregiver on your DrOwl account.
If you are adding your caregiver by text message, click on that option, select whether you would like to add them to your telemarketing calls or not, and then click on the person from the phone contacts that you would like to add as a caregiver by text.
Once they’ve been added as a caregiver, they can join any of your telemedicine calls two different ways:
1. They can go to their homepage and click on the green “Join Telemedicine” button.
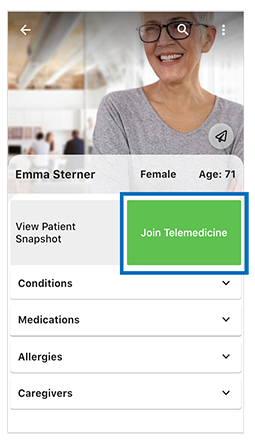
2. Or, they can click on the timeline icon in the bottom right-hand corner of the homepage, look for the person whose telemedicine call they want to join, click on their “View Profile” button, and then click on the green “Join Telemedicine” button to join the call.

To add a caregiver, click on the plus sign on the bottom right-hand side of your profile image and choose to add caregivers. Then select whether you want to add them by QR code or by text message.
Please note that telemedicine is available in select areas with more being added all the time.
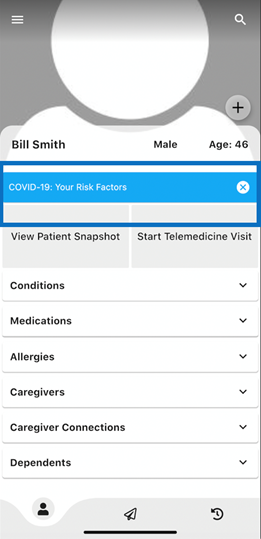
Once you have successfully synced your medical records, return to your homepage on the DrOwl app to see your “COVID-19: Your Risk Factors” in the blue bar. Click on it to open it up and see what your risk factors are for COVID-19.
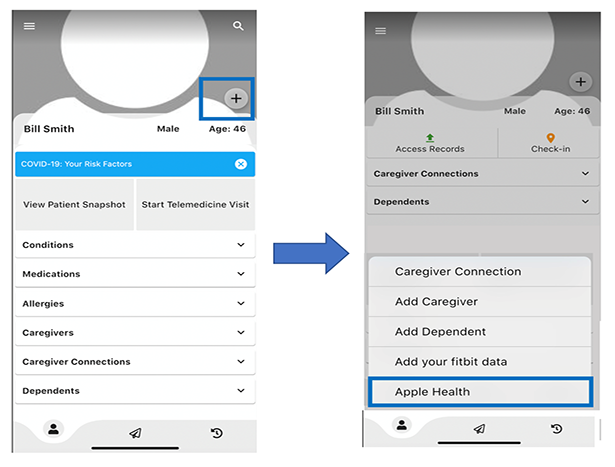
To add your Fitbit data, go to your DrOwl app homepage, and click on the plus sign icon on the lower right-hand side of your profile picture. Then choose to add your Fitbit data when the menu comes up by clicking on it.
You will be asked to sign into Fitbit to sync your Fitbit data with DrOwl.
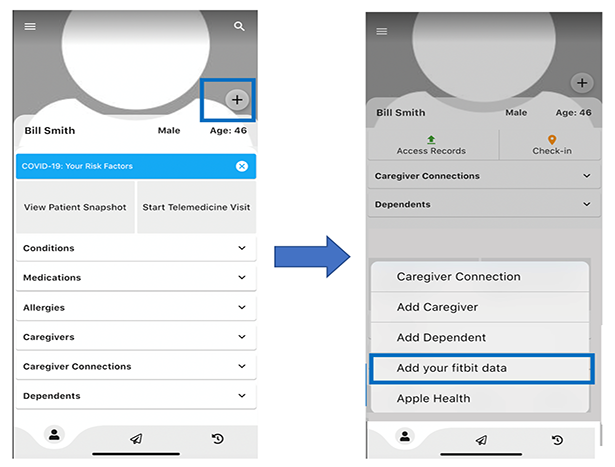
To add your Apple Health data, go to your DrOwl app homepage, and click on the plus sign icon on the lower right-hand side of your profile picture. Then choose the update Apple Health option when the menu comes up by clicking on it.
You will then be asked to allow DrOwl to access and update your Apple Health data which will sync it with DrOwl.
The DrOwl free screening and monitoring tool is one of DrOwl’s free features that is being used by businesses, schools, restaurants, and senior communities across the nation to help keep their communities safer from COVID-19.
DrOwl’s screening solution makes it easy to:
Getting started is fast and easy. Simply go to CheckIn.DrOwl.com if you would like to sign your organization up to use the DrOwl free screening tool.
If you are a visitor or employee who is looking to check into a facility, then go to the iOS or the Google Play stores to download the DrOwl app today to sign up for an account and check-in from the DrOwl app.
Look for the DrOwl icon below:
![]()
There are two ways that you can use DrOwl’s free screening tool to check into a facility.
The first way to check-in is if you haven’t synced your medical history yet.
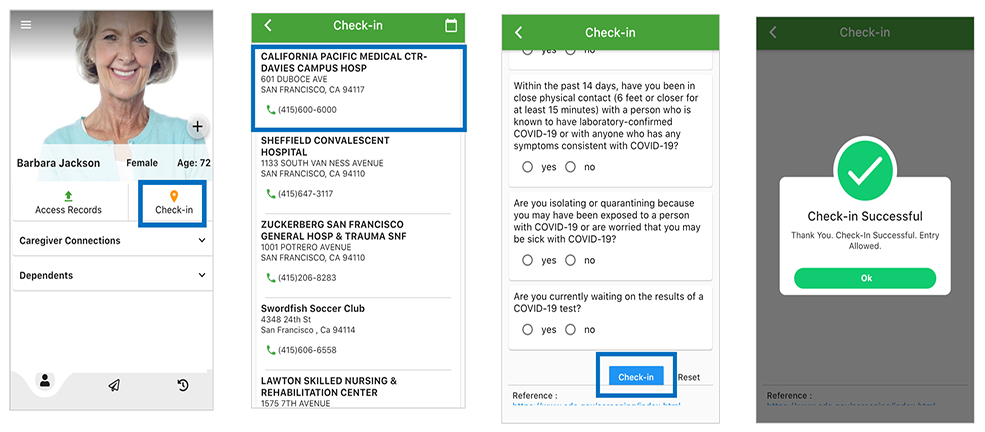
Go to your homepage on the DrOwl app, click on the check-in button, select the facility that you would like to check into, and answer the screening questions.
Please note that DrOwl uses geolocation services that will automatically populate with facilities near you for you to choose from. If you see the one you want to check into, click on it, and answer the screening questions. And if you do not see the facility that you’re checking into, use the search bar up at the top of the screen to find the location you want.
When you are done tap on the blue check-in button at the bottom of the screen to complete the check-in process. You will see a message saying that your check-in has been successful when you are done.
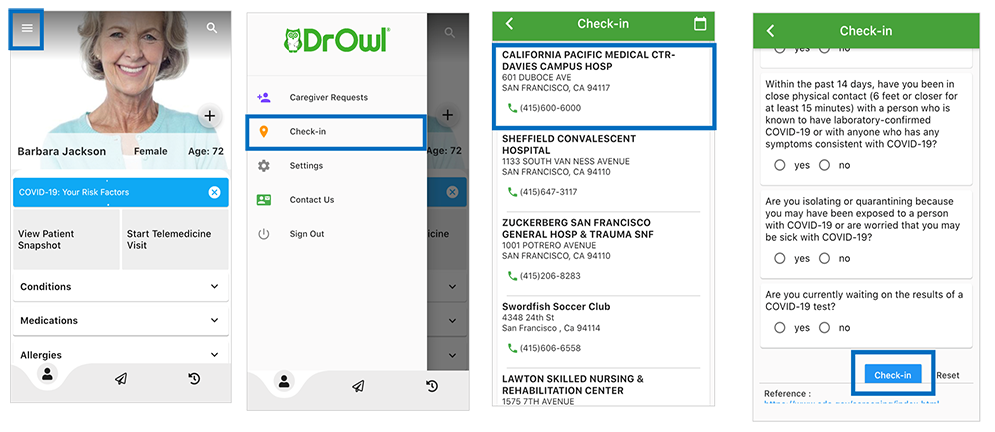
The second way that you can check-in is if you have already synced your medical history to DrOwl:
If you’ve already synced your medical history to DrOwl, then on the homepage of the DrOwl app, you would go to the white three-line menu in the upper left-hand corner of the page to open up the menu. When the menu comes up, click on the check-in button, select the facility that you would like to check into, and answer the screening questions.
Please note that DrOwl uses geolocation services that will automatically populate with facilities near you for you to choose from. If you see the one you want to check into, click on it, and answer the screening questions. And if you do not see the facility that you’re checking into, use the search bar up at the top of the screen to find the location you want.
When you are done tap on the blue check-in button at the bottom of the screen to complete the check-in process. You will see a message saying that your check-in has been successful when you are done.
To check your dependent into any facility, go to the DrOwl app homepage and click on dependents.
Then choose the dependent that you would like to check-in, and click on their name to bring up their profile. When their DrOwl profile is up, click on the check-in button to check them into a facility.
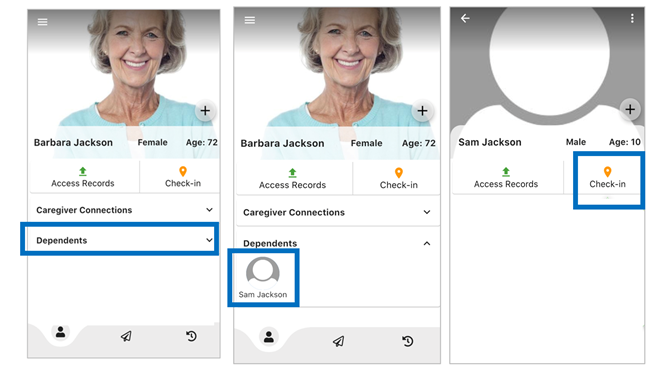
The next step is to select the location that you would like to check them into.
When you find it, click on the location to bring up their screening questions, answer the questions, and click on the blue check-in button when you are done to finish checking in your dependent. You’ll see a message saying that your check-in has been successful when you are done.
If you have more than one dependent that you are checking in, you’ll need to repeat the same steps as above until you’ve checked in all of the dependents that you need to.

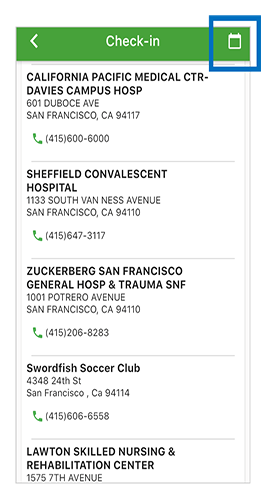
Once you click the “check-in” option, you can find your check-in history by choosing the calendar icon in the top right-hand corner of the page. It will let you see your complete history of check-ins.
The DrOwl free screening and monitoring tool is one of DrOwl’s free features that is being used by businesses, schools, restaurants, and senior communities across the nation to help keep their communities safer from COVID-19.
DrOwl’s screening solution makes it easy to:
![]()
Getting started is fast and easy. Simply go to CheckIn.DrOwl.com if you would like to sign your organization up to use the DrOwl free screening tool.
It’s easy to sign up your organization to use DrOwl’s free check-in screening and monitoring solution.
The first step is to create a DrOwl administrative account for your organization.
It’s important to note that:
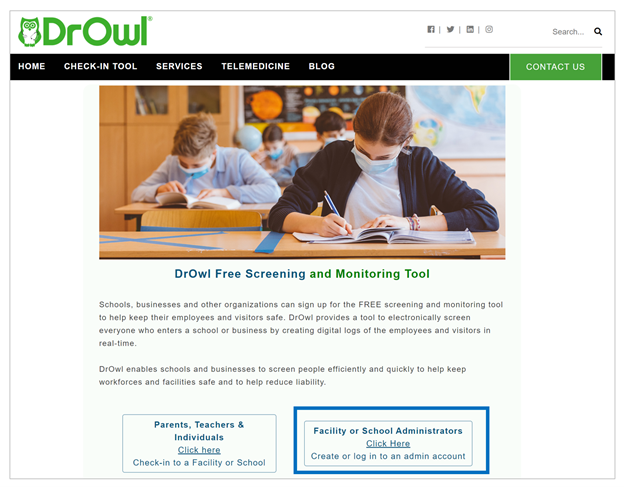
To sign your organization up to use the DrOwl screening solution, click on the check-in tool in the menu at the top of the DrOwl homepage.

This will take you to DrOwl’s check-in sign-up page. When you get to that page, click on the “Facility or School Administrators” button on the bottom right-hand side of the page to start the process of creating an administrative account for your organization.
The next step is to choose your facility type by clicking on the bubble to the left of the choice that matches your type of facility.

If you are signing up for a business, school, or “other” type of facility choose the facility type, and then you will be able to add in your organization name, address, phone number, email, and password.
Please note that your password needs to have at least 6 characters, with at least one upper case letter, one number, and one special character (e.g. $, @, !, etc.).
Once you have added in that information, click on the green sign up button at the bottom of the page to finish signing up your organization for the DrOwl check-in tool.
If you are signing up for a nursing home, choose a nursing home from the types of facilities listed, put in your zip code, and click on the green search icon to bring up the facility information for the unclaimed nursing homes in your zip code.

If you see your nursing home, click on the bubble to the left of your nursing home to select it, and then click on the next button on the lower left-hand corner.
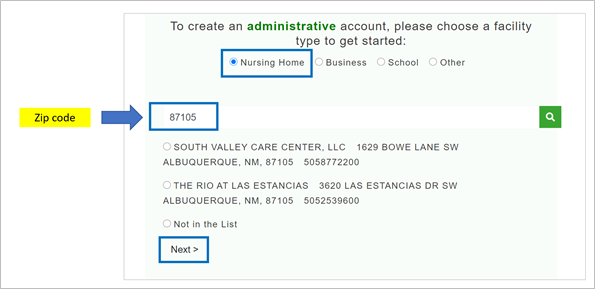
If you don’t see your nursing home in the ones listed for your zip code, click the bubble to the left of the “not in the list” choice to select it. You will then be able to add in your organization name, address, phone number, email, and password.
Please note that your password needs to have at least 6 characters, with at least one upper case letter, one number, and one special character (e.g. $, @, !, etc.).
Once you have finished adding in your account information, click on the green sign up button at the bottom of the page to finish signing up your organization for the DrOwl check-in tool.
To log in to your organization’s administrative DrOwl account, click on the check-in tool in the menu at the top of the page.
This will take you to the DrOwl check-in tool sign-up page. Click on the “Facility or School Administrators” button on the bottom right-hand side of the page to log into the administrative account for your organization.
The next step is to click the green login button at the bottom of the page, and then log into your administrators account with your email and password.

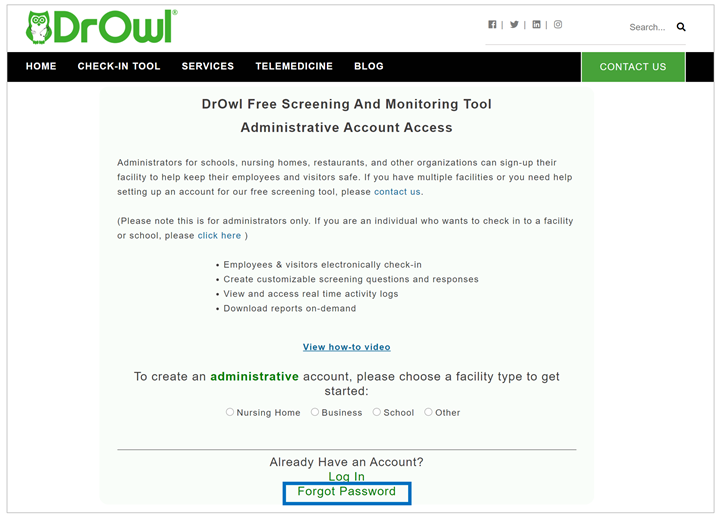
If you forgot your password, you will need to reset it. Start by clicking on the check-in tool in the menu at the top of the site.
This will take you to the DrOwl check-in tool sign-up page. Click on the “Facility or School Administrators” button on the bottom right-hand side of the page to log into the administrative account for your organization.
The next step is to click the green forgot password button at the bottom of the page to reset your password.
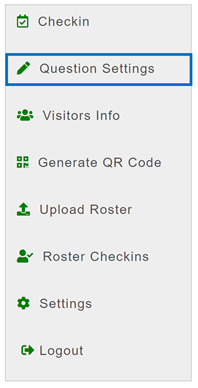
When you are logged in you will see all of your customizable menu options on the DrOwl check-in homepage.
To customize your screening questions, go to the menu on the left-hand side, and choose “question settings”.
You will then see a list of the standard questions to help get you started in keeping your community safer. The goal of these questions is to screen for symptoms and history of COVID-19 exposure.
To add a new question:
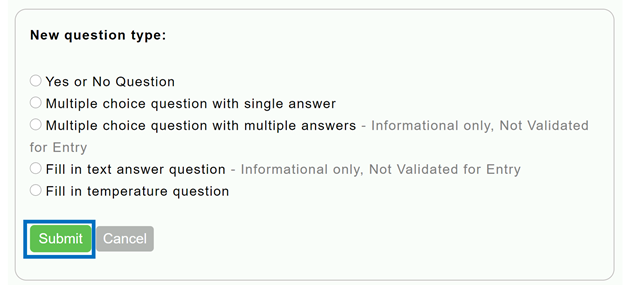
It’s important to note that some of the question types are informational only, while others are questions that can change whether or not employees and visitors are allowed into your facility.
Here are the steps for the different types of questions that you can add:
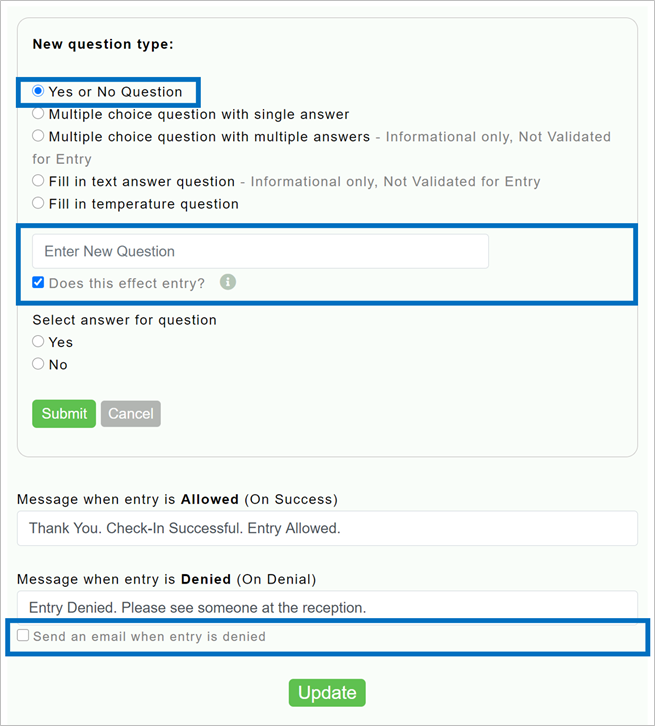
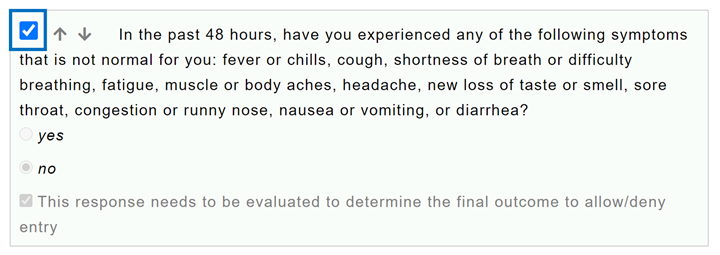
1) To add “yes or no” questions, select that type of question, and:
Click on the box to the right of the “send an email when an entry is denied” if you would like to be sent an email when visitors are denied entry to your facility based on their response to a question.
When you are done editing the entry messages, click on the green “update” button to finish updating them.
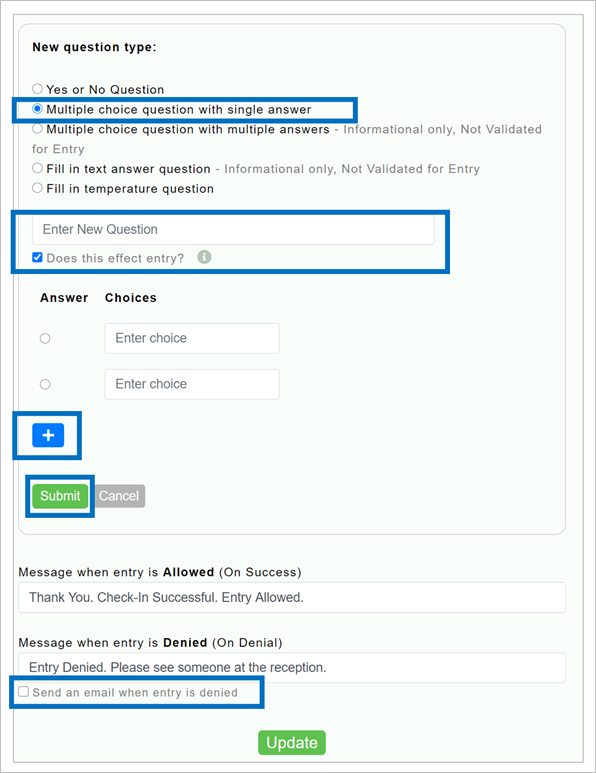
2) To add “multiple choice question with a single answer”, select that type of question, and:
Click on the box to the right of the “send an email when an entry is denied” if you would like to be sent an email when visitors are denied entry to your facility based on their response to a question.
When you are done editing the entry messages, click on the green “update” button to finish updating them.
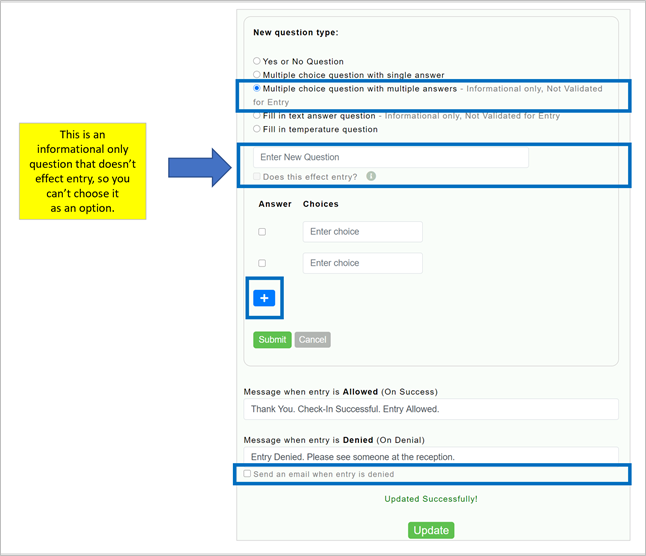
3) To add “multiple choice questions with multiple answers”, select that type of question, and:
Because this is an informational only question that doesn’t affect entry, you will be unable to choose the “send an email when an entry is denied” option for when visitors are denied entry to your facility based on their response to a question.
When you are done editing the entry messages, click on the green “update” button to finish updating them.
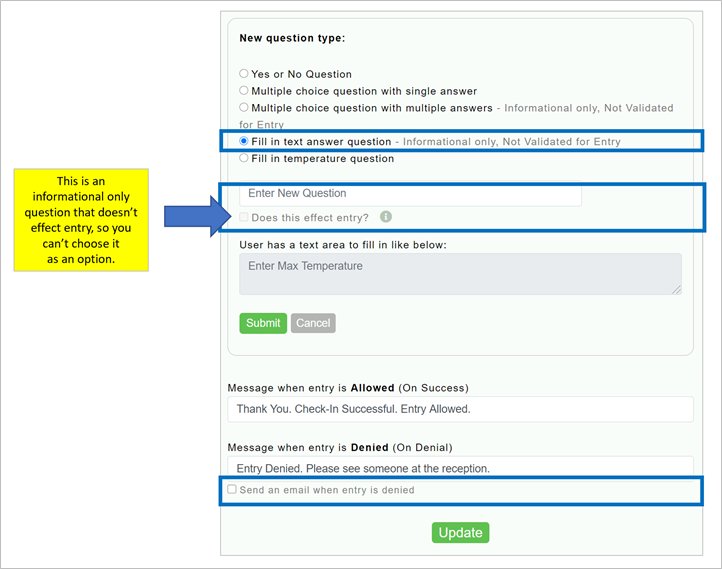
4) To add a “fill in text answer question”, select that type of question, and:
Because this is an informational only question that doesn’t affect entry, you will be unable to choose the “send an email when an entry is denied” option for when visitors are denied entry to your facility based on their response to a question.
When you are done editing the entry messages, click on the green “update” button to finish updating them.
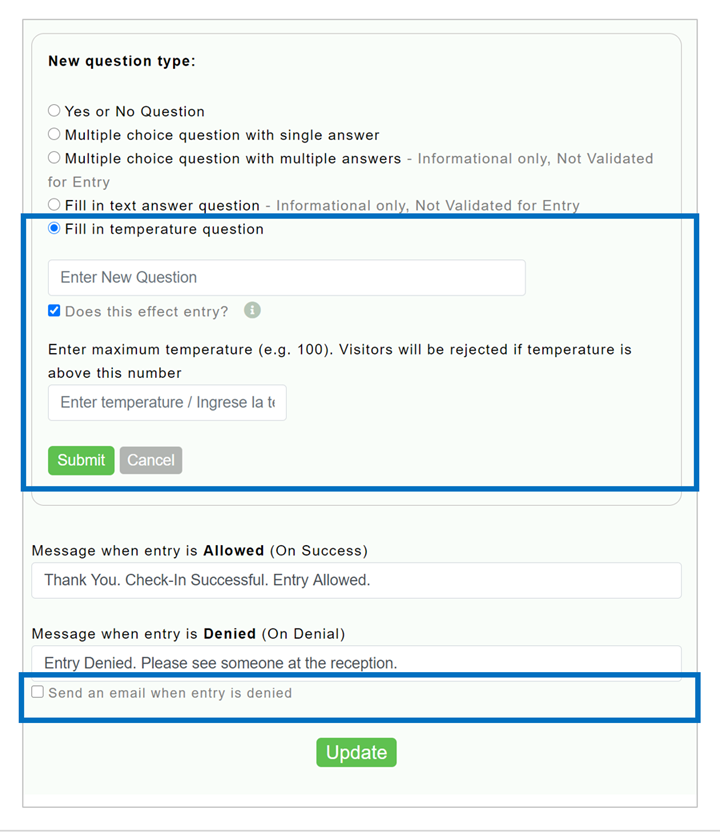
5) To add a “fill in temperature question”, select that type of question, and:
Click on the box to the right of the “send an email when an entry is denied” if you would like to be sent an email when visitors are denied entry to your facility based on their response to a question.
When you are done editing the entry messages, click on the green “update” button to finish updating them.
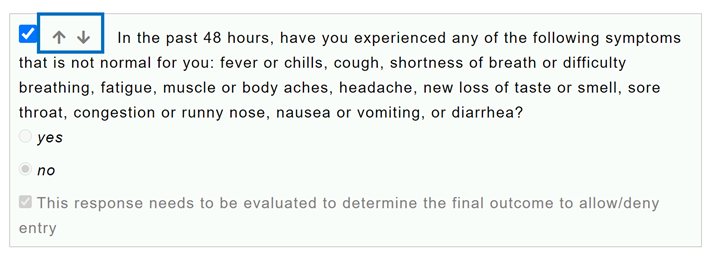
To re-order your screening questions, log into CheckIn.DrOwl.com, go to your check-in homepage, and click on the question settings in the menu on the left-hand side of the page to bring up your organization’s screening questions.
This will bring up the screening questions, and you will need to click on the up or the down arrows to the left of these questions to move the question up or down. You will need to individually move each question up or down until the screening questions are in the order that you would like.
To remove screening questions, log into CheckIn.DrOwl.com, go to your check-in homepage, and click on the question settings in the menu on the left-hand side of the page to bring up your organization’s screening questions.
This will bring up the screening questions, and you will need to click on the blue box to the left of the question that you want to remove to “uncheck” it. This will remove the question from your organization’s screening questions.
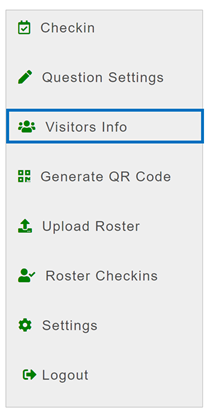
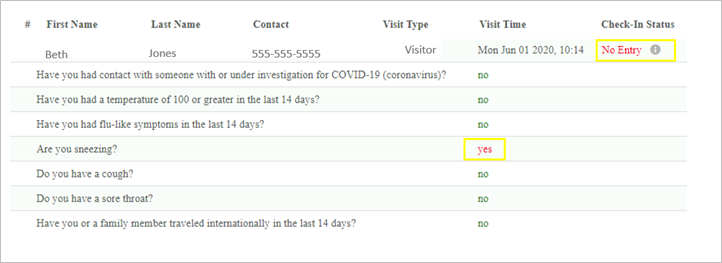
To find your visitor’s activity log, log into CheckIn.DrOwl.com, go to your check-in homepage, and click on visitor’s info in the menu on the left-hand side of the page to bring up your organization’s activity log.
This will bring up the visitor details for everyone who has checked into your facility, including their name, contact, type of visitor, visit time, and check-in status.

If you click on their check-in status you will see how they answered each of your screener questions.
If they received a “no entry” status when they checked in, it’s an easy way to see which question(s) caused them to be denied entry into your facility.
You also can pull reports by specific date ranges and export reports to excel as needed.

To generate a QR code for your facility, go to the check-in homepage menu on the left-hand side, and choose the generate a QR code option.
We also recommend that you print out a copy of the QR code and put it on the door to the facility entrances with a note asking staff and visitors to check-in. That way it’s quick and easy for them to start answering the DrOwl screening questions.

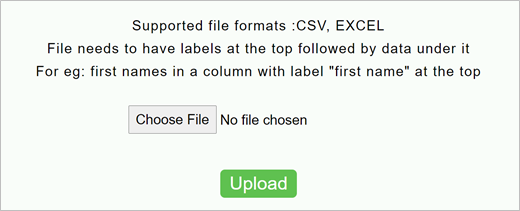
To upload a staff roster for your facility, go to the check-in homepage menu on the left-hand side, and choose the upload roster option.

You will then be able to choose the roster that you’d like to add in, using either a CSV or EXCEL format. To choose what you want to add, click on the choose file button, choose the file, and then click the green upload button to finish adding your roster to your organization’s administrative account.
To logout, go to the menu options on the DrOwl check-in homepage and click on logout.